Code Robo
- Generate Java Code To Parse XML
- Generate Java Code To Parse JSON
- XSLT(XSL) Code Generator
- XSLT To Produce JSON(*New)
- REST API/Service Code End To End (Spring boot/MVC)(*New)
- XML To POJO(Java Bean)
- XML To JavaBean
- XML To XSD (XSD From XML)
- XML To XPath (Gen XPath)
- XSD To XML(XML From XSD)
- XSD To Java Bean(POJO)(*New)
- JSON To Java Bean
- JSON To POJO(Java Bean)
- JSON To JavaScript
- JSON To Angular Code(*New)
- JSON To AngularJS Code
- JSON Path Generator
- JSON To JSON Schema(*New)
- JSON Schema To JSON(*New)
- Generate DAO Code(SQL To Java)
- Generate JUnit TestCase(*New)
Formatter
Comparator
Tester
Merger
Converter
- Base64 To Text / Text To Base64
- Base64 To Image (*New)
- CSV To XML
- CSV To JSON
- JSON To YAML
- JSON To XML
- JSON To Text
- JSON To MappingDoc
- JSON To Excel
- JSON To Property
- Property To YAML
- Property To JSON
- SQL To JSON / XML (*New)
- XML To Excel
- Text To HTML
- XML To JSON
- XML To Mapping Doc
- XML To Template
- XML To Text
- YAML To Property
- YAML To JSON
Utility
Java Code Complience
Validator
EncoderDecoder
Virtual Service
How To Install Sterling Commerece in Linux. |
Talk to EasyAssistant |
This page demonstrate How To Install Sterling in Linux 8 (RHEL / CentOS)..
Installation of Sterling Commerce is difficult task. This steps help you on installation.To install containerized Sterling commerce, you need to install following softwares.
 Docker:
Docker Compose:
Developer Tool Kit (DTK)
Docker:
Docker Compose:
Developer Tool Kit (DTK)
Docker Installation
- Changed current user to root user:
Commands:
1. sudo su
- change the mirror-list in all yum.repos.d files. Replace the
base url with vault.centos.org
Commands:1. cd /etc/yum.repos.d/ 2 sed -i 's/mirrorlist/#mirrorlist/g' /etc/yum.repos.d/CentOS-* 3. sed -i 's|#baseurl=http://mirror.centos.org|baseurl=http://vault.centos.org|g' /etc/yum.repos.d/CentOS-* 4. dnf distro-sync
- Steps to install docker CE(Community Edition) on RHEL 8 Server
Commands:
- cd /
- sed -i 's/mirrorlist/#mirrorlist/g' /etc/yum.repos.d/CentOS-*
- sed -i 's|#baseurl=http://mirror.centos.org|baseurl=http://vault.centos.org|g' /etc/yum.repos.d/CentOS-*
- dnf config-manager --add-repo=https://download.docker.com/linux/centos/docker-ce.repo
- dnf list docker-ce
- dnf install docker-ce --nobest -y
- systemctl enable docker
- systemctl start docker
- docker --version
Docker Compose Installation:
- To install Docker Compose, Pleae use following steps:
Command and Steps:- sudo curl -L "https://github.com/docker/compose/releases/download/1.25.4/docker-compose-$(uname -s)-$(uname -m)" -o /usr/local/bin/docker-compose
- sudo chmod +x /usr/local/bin/docker-compose
- /usr/local/bin/docker-compose --version
- Restart the system.
Developer Tool Kit(DTK):
- Create oms folder in root directory:
Command:- mkdir oms
- chmod 777 oms
- copy developer tool kit jar:
Command:- cp ./devtoolkit_docker.tar /oms/
- cd /oms
- unzip developer tool kit tar:
Command:- tar -xvf devtoolkit_docker.tar && chmod +x devtoolkit_docker/compose/*.sh
- cd devtoolkit_docker/compose
- create a link to docker-compose:
Command:- sudo ln -s /usr/local/bin/docker-compose /usr/bin/docker-compose
- Install:
Command:- ./om-compose.sh setup
- Accept License Agreement:
Command:- Read the prompt messages and press enter key (multiple times) to accept it. it will take 2 hrs
- At the end you need to type "accept"
Login To Console:
- Open IE browser and type following urls:
URLs:- https://localhost:9443/smcfs/console/login.jsp(Console)
- https://localhost:9443/wsc/store/login.do (Webstore)
- https://localhost:9443/isccs/isccs/login.do? (Call Center)
- https://localhost:9443/smcfs/yfshttpdbi/sterlingdbqueryclient.jsp (DB Client)
- https://localhost:9443/smcfs/yfshttpapi/yantrahttpapitester.jsp (API Tester)
- https://localhost:9443/sbc/sbc/login.do (SBC)
- https://localhost:9443/sma/sma/console/login.jsp (SMA)
| Note: Here just high level steps are given. You need to follow product installation guideline . |
How To Launch Configurator |
- From IE Browser or Microsoft Edge Browser
- Using Command Line
Launching Confgiurator (Application Manager ) from Coomand Line:
1. cd /oms/devtoolkit_docker/runtime/ApplicationManagerClient
2. java -jar client.jar
Launching Confgiurator (Application Manager ) From IE Browser
To launch application manager (Configurator) from browser, You need to have following softwares in your laptop as Pre-requisite.
- IE 9.0 or higher version installed in your laptop. or Mirosoft Edge Browser
- 32 Bit JDK/JRE installed in your laptop
- If your laptop does not have IE. You have Edge browser. In that case open console url in Edge Browser, then change it to IE mode (there will be a IE icon on the right top corner of window. Just click on the icon)

Steps To Launch Configurator (Application Manager) from IE:
- Login to application console. URL: https://localhost:9443/smcfs/console/login.jsp(Console)
- Login to console with admin/-password-
- Click on the Menu item "Application Manager"
- Wait for 5-10 min. new window should open which actually an Java Applet.
| Trouble shooting: |
- Open Controll Panel. You should see a Java icon. Click on that
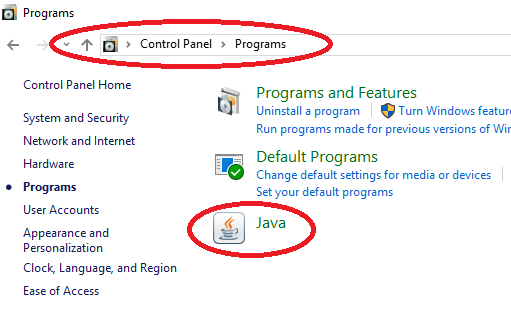
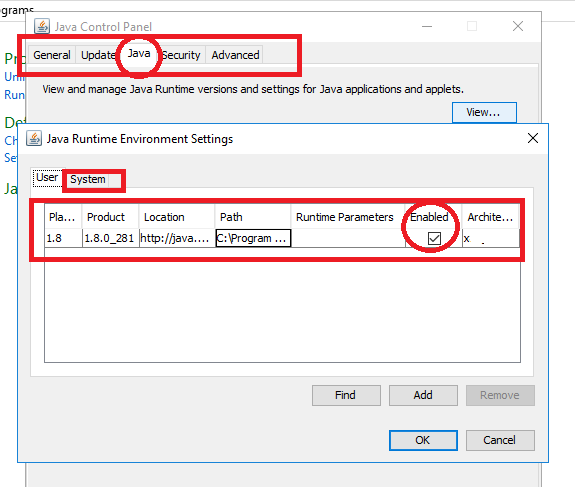
- Enable Debuging as shownn in the screenshot

- Enable right java as shown below.
- Restart your system. Then try again.
| Post Your Comment: |