Code Robo
- Generate Java Code To Parse XML
- Generate Java Code To Parse JSON
- XSLT(XSL) Code Generator
- XSLT To Produce JSON(*New)
- REST API/Service Code End To End (Spring boot/MVC)(*New)
- XML To POJO(Java Bean)
- XML To JavaBean
- XML To XSD (XSD From XML)
- XML To XPath (Gen XPath)
- XSD To XML(XML From XSD)
- XSD To Java Bean(POJO)(*New)
- JSON To Java Bean
- JSON To POJO(Java Bean)
- JSON To JavaScript
- JSON To Angular Code(*New)
- JSON To AngularJS Code
- JSON Path Generator
- JSON To JSON Schema(*New)
- JSON Schema To JSON(*New)
- Generate DAO Code(SQL To Java)
- Generate JUnit TestCase(*New)
Formatter
Comparator
Tester
Merger
Converter
- Base64 To Text / Text To Base64
- Base64 To Image (*New)
- CSV To XML
- CSV To JSON
- JSON To YAML
- JSON To XML
- JSON To Text
- JSON To MappingDoc
- JSON To Excel
- JSON To Property
- Property To YAML
- Property To JSON
- SQL To JSON / XML (*New)
- XML To Excel
- Text To HTML
- XML To JSON
- XML To Mapping Doc
- XML To Template
- XML To Text
- YAML To Property
- YAML To JSON
Utility
Java Code Complience
Validator
EncoderDecoder
Virtual Service
Sample Java Code To Connect Watson Assistant |
Talk to EasyAssistant |
This page demonstrate how to connect to IBM Watson Assistant from Java Applicaton (Java Client Program). .
Here one simple example is given on how to connect to a Watson assistant, create a session and send a request message and get the response.Pre Requisite: It's assumed that you have already configured a Watson assistant at https://*****.assistant.watson.cloud.ibm.comand you are trying to connect your Watson assistant from a Java client code.
Sample avaCode:
 package com;

import com.ibm.cloud.sdk.core.security.IamAuthenticator;
import com.ibm.watson.assistant.v2.Assistant;
import com.ibm.watson.assistant.v2.model.CreateSessionOptions;
import com.ibm.watson.assistant.v2.model.MessageInput;
import com.ibm.watson.assistant.v2.model.MessageOptions;
import com.ibm.watson.assistant.v2.model.MessageResponse;
import com.ibm.watson.assistant.v2.model.SessionResponse;

public class ConnectWatsonAssistant {

	public static void main(String[] args) {

		String apiKey = "rH*****************************8nV";
		String version = "2021-08-18";
		String serviceUrl = "https://api.us-south.assistant.watson.cloud.ibm.com/instances/******************";
		String assistantId = "25**********************5";

		IamAuthenticator authenticator = new IamAuthenticator(apiKey);
		Assistant assistant = new Assistant(version, authenticator);
		assistant.setServiceUrl(serviceUrl);
		CreateSessionOptions options = new CreateSessionOptions.Builder(assistantId).build();
		assistant.createSession(options);
		SessionResponse response = assistant.createSession(options).execute().getResult();

		System.out.println("Session="+response);

		MessageInput input = new MessageInput.Builder().text("I am not feeling well.").build();
		MessageOptions messageOptions = new MessageOptions.Builder().assistantId(assistantId)
				.sessionId(response.getSessionId()).input(input).build();
		MessageResponse messageResponse = assistant.message(messageOptions).execute().getResult();

		System.out.println("ResponseFromWatson=" + messageResponse);

	}

}
It uses IBM Watson Assistant V2 API. It's part of IBM Watson Developer Cloud Java SDK If you are using Maven project please add the following dependency. Or downdload the jar and add to your project.
<?xml version="1.0" encoding="UTF-8"?>
<dependency>
<groupId>com.ibm.watson</groupId>
<artifactId>ibm-watson</artifactId>
<version>9.2.0</version>
</dependency>
Now main question is from where we get the values of Api Key, Version, Servie URL and Assistant Id:
- apiKey - API key of to access IBM Watson services(e.g. Watson Assistant) which you have configured in IBM Cloud(e.g. https://******.assistant.watson.cloud.ibm.com/).
- version - This is the most confusing one. Its a date in YYYY-MM-DD format. Mainly it helps to identify if you have multiple version of same Watson Assistant
- serviceUrl - URL of your Assistant which you have configured.
- assistantId - Unique identifier of your Watson Assistand
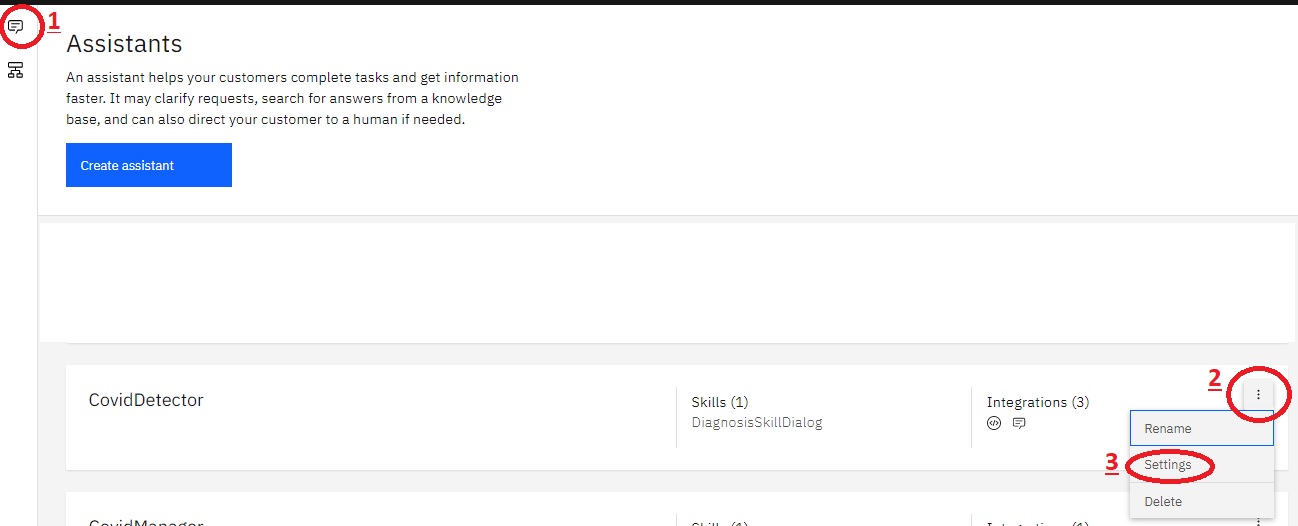
You will get the above parameter values from Assistant settings at IBM Cloud (e.g. https://*****.assistant.watson.cloud.ibm.com/) where you have configured your Watson Assistant. Screenshot with navigation is given below.
Assistant Page:
Assistant Setting Page:
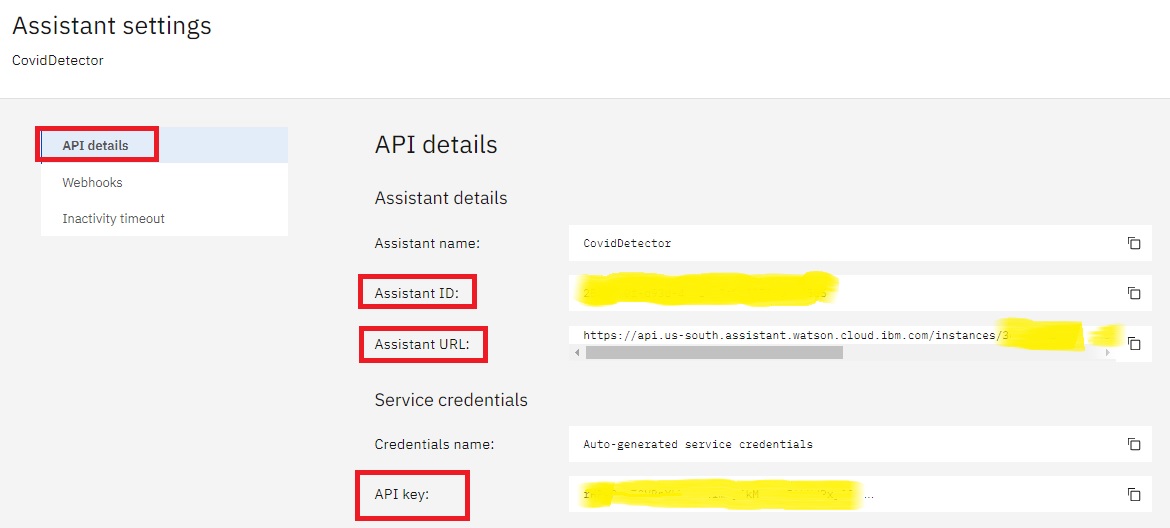
| Note: There is a catch on serviceUrl value. Please DO NOT take the entire value of Assistant URL from Setting page / screen. Take up to https://api.us-south.assistant.watson.cloud.ibm.com/instances/3c5a522d-98a3-4bf8 (Upto before /v2) |
Output Of The Above Program:
Session={
  "session_id": "***********-abb5-4f1c-******2f9d"
}

ResponseFromWatson={
  "output": {
    "generic": [
      {
        "response_type": "text",
        "text": "What difficulties you are facing?"
      }
    ],
    "intents": [
      {
        "intent": "NotFeelingWell",
        "confidence": 1.0
      }
    ],
    "entities": []
  },
  "user_id": "**********-abb5-**********"
}
Please provide your feedback here
| Post Your Comment: |